Last updated: September 10, 2026
Key Takeaways
- Add at least 25% headroom above your estimated peak flow.
- Next, measure pressure with a $10 to $20 pressure gauge screwed onto an outdoor spigot or laundry tap.
- A problem shows up when the estimate is below what your family actually does at 7 a.m.
- What matters is the cartridge surface area and the pressure drop at your actual flow.
Table of Contents

- Who this applies to, and what I’m assuming
- How do I size a water filter for my house?
- What size water filter do I need for my house?
- What do I check before I call a contractor?
- What are the mistakes that make a filter feel “too small”?
- When does the standard sizing approach stop working?
The right answer to what size water filter do I need for my house is the filter size that fits your household’s peak flow, your water problem, and the pressure drop your plumbing can live with. Not the logo. Not the box size. For a typical whole-house water filter, gallons per minute matter more than marketing copy, because the wrong pick can leave you with weak shower pressure, short filter life, or a setup that never quite solves the issue.
Who this applies to, and what I’m assuming
This is for a homeowner or property manager who wants a point-of-entry, whole-house water filter — not a pitcher, and not a single faucet cartridge. I’m assuming you already know whether the issue is chlorine taste, sediment, iron staining, sulfur odor, hardness, or an unknown well-water problem. I’m also assuming you can read a water bill or at least estimate how many fixtures may run at the same time.
Also, I’m assuming a typical house with a 3/4-inch or 1-inch main line and municipal water or a private well. If you have a commercial building, a fire line, a booster pump, or a treatment problem that needs reverse osmosis on the entire house, talk to a qualified water-treatment professional because the sizing logic shifts. It shifts a lot. Same goes for very low inlet pressure, heavy sand, or a well that only yields a few gallons per minute. In those cases, the “standard 10-inch canister” answer people like to toss around is usually off base.
The real question is not “What filter brand should I buy?” It is “How many gallons per minute can the filter pass without choking the house?” That number matters more than cartridge diameter by itself. A 10-inch filter housing can work fine for a small apartment-style load; a larger family home with several fixtures running may need a much bigger cartridge, multiple housings in parallel, or a backwashing system. If you have to answer what size water filter do I need for my house, I’d treat this as a sizing job first and a product choice second. And if the plumbing or water quality is anything but straightforward, I’d confirm the design with a water-treatment professional.
Cloudy water after storms? Rotten-egg smell? Orange or black stains? Any health-related contamination concern? Then the sizing conversation should wait until you know the water report. For a private well, that usually means a lab test or, at minimum, a detailed field test panel. Without that, you’re guessing at the wrong problem. That math stops working fast.
How do I size a water filter for my house?
You size a whole-house water filter by matching the house’s peak demand to the filter’s rated flow, then leaving room for pressure loss and dirt loading. For what size water filter do I need for my house, the cleanest method is simple: estimate peak gallons per minute, choose a filter rated above that figure, and check that the pressure drop at normal flow still leaves the house usable. The U.S. Environmental Protection Agency’s private well guidance and NSF product certification information are solid starting points for checking water quality and treatment claims. EPA private wells and NSF standards and certifications can help you confirm the problem before you size the fix.
Here’s the process I’d use.
- List the fixtures that can run at the same time. Count bathrooms and any other likely simultaneous use. A shower is commonly 2.0 to 2.5 gpm, a washer roughly 1.5 to 2.0 gpm, and a hose bib can be 5 gpm or more. Check that total against the fixtures you actually have. A problem shows up when you assume only one bathroom will ever run. And then the morning rush laughs at you.
- Estimate peak household flow in gpm. Add the likely simultaneous uses. A smaller home may peak around 5 to 8 gpm, while a larger family house can push 10 to 15 gpm or more. Make sure the total reflects real use, not every fixture on paper. A problem shows up when the estimate is below what your family actually does at 7 a.m. Brutal, but true.
- Check your static pressure and usable pressure. Static pressure is the pressure with no water flowing. You want to know both static and dynamic pressure. If static pressure is already low, a filter with 8 to 15 psi of pressure drop can make the house feel weak. Measure it with a gauge at a hose bib or laundry tap. A problem shows up if you start below about 40 psi and then add a restrictive filter.
- Identify the contaminant and the filter type it demands. Sediment filters are sized differently from carbon filters, iron filters, or catalytic media tanks. A 5-micron cartridge catches fine particles; a 20-micron cartridge passes more water but catches less. Check that the media matches the problem. A problem shows up when you use a sediment cartridge to solve dissolved iron or chlorine. See also our [whole-house filter guide](/whole-house-water-filters) and [water test guide](/water-testing-guide) before you choose a treatment path.
- Read the manufacturer’s flow rating and pressure-drop curve. The flow rating tells you how much water the filter can pass; the pressure-drop curve tells you how much pressure it steals at that flow. Check that the rating is for the same micron rating and housing size you plan to buy. A problem shows up when the brochure gives one number at an unrealistically low restriction.
- Add at least 25% headroom above your estimated peak flow. If your house needs 8 gpm, I’d look for a filter path rated for about 10 gpm or more, unless the water is very clean and pressure is plentiful. Check that there’s room for cartridge loading over time. A problem shows up when the system is sized exactly to the edge on day one. Tight fit. Bad bet.
- Check the plumbing size and location. A 3/4-inch main may be fine for modest flow, but 1-inch service gives more breathing room. Check that the filter can physically fit where the main enters, with enough clearance to change cartridges. A problem shows up when you have to cut into a cramped corner and cannot service the unit without draining half the basement.
- Compare cartridge life to your sediment load. Heavy silt, rust, or sand can clog a small cartridge in days or weeks. Check whether the system is meant for light sediment or heavy loading. A problem shows up when a filter is technically large enough for flow but plugs too quickly to be practical. See our [sediment filter page](/sediment-filters) for a more detailed breakdown.
The practical rule is plain: bigger homes, higher simultaneous flow, dirtier water, and lower inlet pressure all point you toward a larger filter or a different design. A small cartridge in a clear-water city house may be fine. The same cartridge on a sandy well? No chance.
What size water filter do I need for my house?
For what size water filter do I need for my house, many homes land in the 10 to 20 gpm range for the treatment train, not because every house uses that much water continuously, but because peak flow needs to pass without a noticeable drop in pressure. That often means a large cartridge housing, a pair of housings in parallel, or a backwashing whole-house unit, depending on the problem. If you’re unsure, consult a water-treatment professional and use the manufacturer’s flow and pressure-drop data rather than guessing from case size.
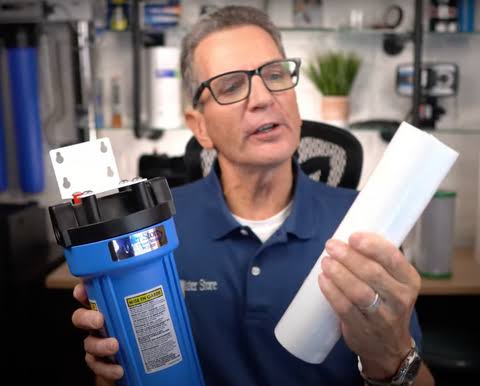
A single 10-inch filter housing is often too small for a full-sized house unless the flow demand is modest and the water is already fairly clean. Common, yes. Sufficient, not always. What matters is the cartridge surface area and the pressure drop at your actual flow. A large-diameter or “big blue” style housing generally gives more capacity than a slim housing, and a backwashing tank gives still more room for sediment or iron because it cleans itself on a cycle instead of clogging and stopping.
Here’s the trade-off, and I want to be blunt: choose a finer filter, such as 1 micron, and you’ll usually catch more particles but lose more pressure and clog faster. Go coarser, say 20 microns, and the water flows more easily but more fine grit gets through. So sizing and filtration level should be chosen together. I would not use a fine cartridge as a substitute for the wrong treatment method. A professional can help confirm whether your issue needs staged filtration, a media tank, or something else.
If you’re on municipal water and mainly want chlorine reduction, a carbon filter sized around the household’s peak flow may be enough. On a well with visible sediment, I’d usually think about staged filtration: a spin-down prefilter or coarse sediment stage first, then a finer cartridge or tank. If the well water carries iron or manganese, plain sediment filtration is the wrong tool. Common mistake. It wastes money fast. See our carbon filter guide for municipal systems and iron filter guide for well-water treatment.
For the local service angle, the cost is driven less by the box on the shelf than by labor, plumbing modifications, bypass valves, media type, and whether the water issue needs one stage or three. A straightforward whole-house cartridge install might be a few hundred dollars in labor plus parts, while a multi-stage system or backwashing setup can run much higher. I’m not giving a fixed price because the spread is wide and water quality changes the bill. Simple as that.
What do I check before I call a contractor?
Check your water pressure, your pipe size, your water source, and your contaminant problem before you call anyone. Those four facts decide whether the contractor should quote a simple cartridge housing, a larger dual-stage setup, or a backwashing treatment tank, and they also help answer what size water filter do I need for my house without overspending.
Start with the water source. Municipal water and well water behave differently. City water often needs chlorine or taste treatment plus sediment control, while well water can bring iron, manganese, hydrogen sulfide, tannins, sand, or bacteria concerns. Then measure pressure with a $10 to $20 pressure gauge screwed onto an outdoor spigot or laundry tap. If static pressure is low, tell the contractor. After that, identify the service line size if you can: 3/4 inch or 1 inch matters because it affects allowable flow and where the filter can be installed. See our water pressure guide before you buy hardware.
I’d also ask what pressure drop the proposed filter adds at 5 gpm, 10 gpm, and 15 gpm — not just what the “capacity” is. Capacity claims without flow data are thin gruel. Ask whether the system can be serviced with a bypass valve, how often cartridges usually need replacement under your water conditions, and whether the quote includes drain routing, unions, and a shutoff valve. Those details decide whether maintenance is a 10-minute job or a service call every time.
If your water report shows a specific issue, ask for the standard used in sizing or reduction. For drinking-water treatment claims, NSF/ANSI standards are the right language to see in the paperwork. For example, NSF/ANSI 42 is commonly used for chlorine, taste, and odor; NSF/ANSI 53 covers certain health-related contaminants; NSF/ANSI 61 relates to material safety. I’m not saying every install needs all three. I am saying the standard should match the problem. The NSF consumer guide is a useful reference when you compare products.
A contractor who skips over pressure, peak flow, and water source is not sizing the system; they are guessing.
What are the mistakes that make a filter feel “too small”?
The most common mistake is buying by house size instead of by flow. A “whole-house” label does not tell you whether a filter can handle 6 gpm or 15 gpm. The consequence is low pressure at showers and laundry, especially when two fixtures run together. The better move is to size to peak demand and check pressure-drop data. See our whole-house filter installation checklist if you want to compare options before you buy.
Another mistake is choosing micron rating too aggressively. A 1-micron cartridge on moderately dirty water can plug quickly and starve the house. The result is frequent replacements and a filter that feels useless after a short time. The better move is staged filtration or a coarser first stage, often 20 microns first and finer later if needed.
A third mistake is ignoring water chemistry. Sediment media will not fix dissolved iron, manganese, or sulfur gas. The result is staining, odor, and false confidence that the “filter” is working. The better move is to match the treatment method to the contaminant, not to the symptom on the faucet.
A fourth mistake is installing a restrictive unit before a pressure-reducing valve or on an already weak system without checking the numbers. The result is a house that loses usable pressure every time a tap opens. The better move is to measure static and flowing pressure first and consider a larger diameter housing or parallel filters.
A fifth mistake is forgetting maintenance access. If the filter is wedged beside a furnace or behind a water heater, cartridge changes get delayed. The result is a clogged housing, poor flow, and sometimes bypassing the system entirely. The better move is to leave enough room to spin off the canister, swap the cartridge, and inspect O-rings without removing other equipment. Otherwise, the setup becomes a nuisance.
When does the standard sizing approach stop working?
The standard sizing approach stops working when the water problem is not simple sediment or chlorine, when pressure is already marginal, or when the house draws more water than a single filter path should handle.
Very low well production: If the well cannot sustain the home’s peak demand, filter sizing is not the first fix — reduce the treatment burden, add storage, or address the well system first. A filter cannot create flow that the well does not produce. Not even close.
Visible sand or grit after every rain: This usually means heavy particulate loading — use a spin-down separator or backwashing sediment stage ahead of any fine cartridge. A cartridge alone will clog too fast and become a maintenance headache.
Iron staining, orange fixtures, or rotten-egg odor: These point to iron, manganese, or hydrogen sulfide, not just “dirty water” — use the correct oxidation or specialty media system, not a bigger sediment filter. Otherwise, the size may be right and the result still wrong.
Low incoming pressure, especially below about 40 psi static: A restrictive filter can make the house feel weak — choose a lower-pressure-drop design, larger housings, or a parallel setup. Ignore this, and the showers will tell you immediately.
Household peak use above one filter path’s rating: If the home regularly runs two showers plus laundry, or an irrigation branch shares the same treatment path, one cartridge housing may be undersized — split the load or move to a larger system. The consequence of staying small is nuisance pressure loss.
Unknown water quality on a private well: If you have not tested for the likely contaminants in your area, you do not yet know what to size for — test first, then size. A wrong first purchase can cost more than the test.
Space limits at the main entry: If there is no room for a larger canister or service clearance, the standard setup may be physically impossible — a contractor may need to reroute piping or use a different configuration. Crowding is a real design constraint, not a minor inconvenience.
Leave a Reply